Paisley Cake

This paisley cake is something I made for my mom’s birthday. I love that the paisley chocolates that decorate this cake resemble a beautiful wrapping paper pattern.

This cake is covered in fondant, and the bow and pearl edging are also made of fondant. The pearl/bead edging is made using a 4mm bead mold brushed with super pearl luster dust (that is why the pearls are shiny and opalescent).

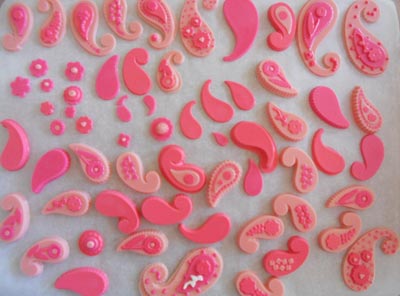
The paisley chocolates are attached to the cake with royal icing. See below for a photo journal of the making of this cake.

This cake is an 8″ square so I leveled the layers using a small cake leveler. I then cut one of the layers in half, so that there would be three layers.

The cake is a champagne cake with a champagne custard filling. I piped a buttercream dam around the perimeter of the cake to make sure that the filling would not ooze out. Champagne cakes used to be popular and could be found in many bakeries. I remember the classic pink champagne cake that was covered in pink chocolate curls. It was stylish and delicious!

The stacked cake is about three and three quarter inches tall. This means that once the cake is crumb coated and covered in fondant, it should be about four inches high.

Here is the crumb coated cake. Crumb coating is applying a light coat of frosting (in this case buttercream diluted with water) to cover the cake and seal in all of the crumbs. Once this crumb coat sets up, you are ready to apply your final coat of frosting or cover your cake in fondant. The crumb coat is a rough coat and does not need to be perfect. It is intended to seal in the crumbs so that your final coat will not have any crumbs or bits of cake peeking through.

If you are covering your cake in fondant, you will want your crumb coat to be smoother than if you were going to apply another layer of frosting. This is because the shape and texture of the frosting that is underneath the fondant will show, so you want to get it as smooth as possible. To do this I fill an asparagus steamer with boiling water. I then dip a large bent spatula into the water and wipe it off with a paper towel and then run the hot spatula on the sides and top of the cake to smooth.

This is the cake after I have smoothed it with a hot spatula. Don’t fuss over the frosting too much, because the fondant will cover small imperfections.

This is the fondant covered cake. The red silicone rolling pin is the one that I use to roll the fondant. The straight rolling pin in the background is the one that I use to roll the fondant onto and pick up to lift and place on the cake. I use the fondant smoother (right side) to smooth the fondant over the cake.

I use an x-acto knife to trim the fondant from the bottom of the cake.

For this cake, I am trimming the fondant ribbon with fondant pearls/beads. I use the 4 mm bead maker to make the strings of pearls that will be attached to the ribbon. The super pearl luster dust is brushed into the pearl mold to keep the fondant from sticking.

Next I begin adding the fondant ribbon and pearls to the cake. Both are attached using a tiny amount of water (painted using a fine paint brush).

Now its time to start adding the paisleys to the cake. The fondant bow is formed using rolled paper towels stuffed in the loops to keep its shape while it dries overnight.


The paisley chocolates are attached to the cake with royal icing. Royal icing is very strong and the chocolates need to be held in place for less than a minute to get set on the cake.

The bow has dried overnight and is now sturdy enough for the pearl trim to be applied.

The fondant pearls are attached to the ribbon by applying a very small amount of water to the ribbon using a fine tipped paint brush. The strings of pearls will stick to the surface that is covered with water, but too much water will make them fall off and can also leave marks on the fondant.

Attaching the pearls to the bow loops was probably the hardest part. I had some strands of pearls that I had made the night before, but found that I could not attach them to the bow loops because the curves were too much and would cause the strands to break. I ended up making additional fresh pearls for the bow loops.

Even though the bow looked like one piece when it was drying, it is actually five different pieces. If it was all one piece, it would be even harder to attach the pearl trim. The final five pieces were assembled on top of the cake as the final step.

Here is the finished cake! It was a lot of work but definitely worth it!

The paisleys with polka dots are my favorite.