Paisley Chocolates


When I first saw these paisley chocolate molds I knew that I had to make something special with them. They are so whimsical and unique and add a lot of detail to any creation.
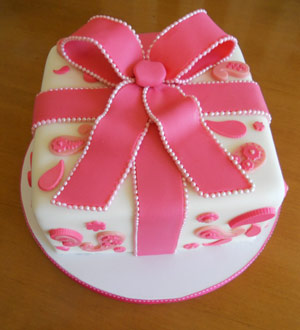
I made these chocolates to attach to a cake that I was making for my mom’s birthday.The cake is designed to look like a gift and I think that these paisleys are perfect because they really look like a beautiful wrapping paper pattern. My mom’s favorite color is pink, so of course the paisleys are made using three shades of pink chocolate.

To make the paisleys you will need the following ~
Paisley accessory mold and paisley mini mold (if you are making a large quantity I recommend you use at least two molds. The more molds, the faster the process will go.)
2 bags of pink candy melts
Pink or red candy coloring
Tools needed for this project are as follows ~
Three 12oz squeeze bottles

Very fine tipped paint brush
Electric skillet (optional)
Toothpicks (use these to periodically stir the chocolate in the candymelter palette)
Begin by selecting the three colors that you will use to make your paisleys. I suggest deepening shades of the same color, but you can use any color combination. I chose pinks, but once I saw the finished chocolates, I found that two of the shades were too close to together and could not really be distinguished from each other, so I suggest distinctly different shades.
Step 1 – Pour both bags of pink candy melts into a microwave safe bowl(I use a large Pyrex bowl). Melt in the microwave on the defrost setting in 30 second increments stirring each time. It is critical that you stir in between each 30 second increment. This will ensure that the chocolate is heating evenly and will prevent it from getting too hot which will make it seize and become difficult to work with.

Step 2 – Use a funnel to fill one 12 oz squeeze bottle with melted chocolate and place it in the electric skillet which should be turned on to the lowest possible setting and lined with thick dish towels. The electric skillet is great because it will keep your chocolate from cooling down and hardening while you work. Rotate the bottle every so often to ensure that it is evenly heated. Note – Do not leave the electric skillet unattended as it is a potential fire hazard. If you are not using an electric skillet to keep your chocolate at working temperature, you may have to microwave the chocolate once it is too cool to work with. You can do this by removing the squeeze bottle lid and placing the open squeeze bottle in the microwave on defrost setting for 20 second increments until the chocolate is sufficiently warm.

Step 3 – Divide the remaining chocolate into two separate bowls. Use the red or pink candy food coloring to tint the remaining two bowls of chocolate to different shades. Make sure you are using candy food coloring as regular coloring is not suited for use with chocolate because it is water based and will cause the chocolate to seize. Candy food coloring is an oil based product that is specifically designed for use with chocolate. Begin by dropping a couple of drops into the chocolate, stir and continue to add coloring until you reach the desired shade.
Step 4 – Use a funnel to fill the other two squeeze bottles with the new shades of chocolate you just mixed. Place the bottles in the electric skillet to keep them warm.
Step 5 – Plug in the candymelter palette and squeeze a dollop of each of the three different shades of pink from the squeeze bottles into separate aluminum cups in the palette. This is the chocolate the you will use to paint the details on the paisleys.

Step 6 – Using a very fine tipped paint brush begin painting the first level of detail onto the chocolate mold. You can use any of the three colors that you want, but keep in mind which color you are planning to use as your background color. The background color is the color that you will fill the mold with after the details are dry. The details should contrast the background color so that they really stand out.
Step 7 – Once the first layer of detail has dried (dry time will vary depending on air temperature), you can paint the second layer of detail. I generally paint this layer with the the color that you will not be using for the fill. You have already used one color for the 1st level of detail, and you are planning on using one color to fill the mold, so the only color that is left is the color you will use to paint the second layer of detail.

Step 8 – Once all of the details have dried, it is time to fill the molds. Use the three different colors that you have in the squeeze bottles to fill the molds. You can use the same fill for all of the cavities in the mold or you can vary the fill color. Because I used all different color combinations, I used all three colors to fill the cavities. If I had used light pink and medium pink for the detail colors, I would use dark pink as the fill color. If I used Dark pink and light pink as the detail colors, I would use medium pink as the fill color. The idea behind this is to make the different shades pop as much as possible. If you are putting these decorations on a cake, you may also want to consider the cake background when choosing the fill color. If the cake is white, you know that any darker shades of pink will contrast best against it. If the cake is light pink, you know that a chocolate that is filled with light pink will blend into the color of the cake, and stand out less. Your color choice will depend on the look you are trying to acheive.

Step 9 – Place the molds in the refridgerator for approximately 15 minutes or more until the chocolate is hard.
Step 10 – Release the chocolates from the mold. I do this by turning the mold upside down onto a piece of parchment paper (the chocolate will not stick to this)
Step 11 – Enjoy! These fantastic little chocolate decorations will look amazing on a cake or placed on top of cupcakes or brownies.